Learning how to make a great real estate video really comes down to three main stages: planning what you want to show, capturing high-quality footage, and editing it all together into a story that sells. When you get this workflow right, you stop just showing a property and start creating a powerful sales tool that genuinely connects with buyers.
Your Blueprint for a High-Impact Real Estate Video
In today's market, a listing without a video is a missed opportunity. It’s no longer just a nice-to-have; a video is a strategic move that builds trust and gets people clicking. A well-made video lets potential buyers feel the flow of a home before they even step inside, creating a first impression that photos just can't deliver.
The key is to think beyond a simple slideshow of pictures. You're building a visual narrative. The goal is to showcase the lifestyle the property offers, not just its square footage and features.
Ask yourself what makes this home special.
- Does that morning sun just pour into the kitchen?
- Is the backyard practically begging for a summer barbecue?
- Does the fireplace make the living room feel incredibly cozy?
These are the emotional hooks that stick with buyers, helping them imagine their future in that home. By focusing on telling a story, you make your listings pop and drive up buyer interest in a big way. The numbers don't lie.
Listings with professional videos get a staggering 403% more inquiries than those without them. This stat alone shows that video is essential for agents who want to get more eyes on their properties and sell them faster. You can find even more compelling real estate video statistics that highlight its impact.
Mapping Out the Production Process
Getting organized from the start is the secret to a smooth project. When you break the whole process down into manageable chunks, it feels a lot less overwhelming. Each step logically follows the next, guiding you toward a professional final video.
This flowchart lays out the simple, three-stage journey of any real estate video project, from the initial idea to the final edits.
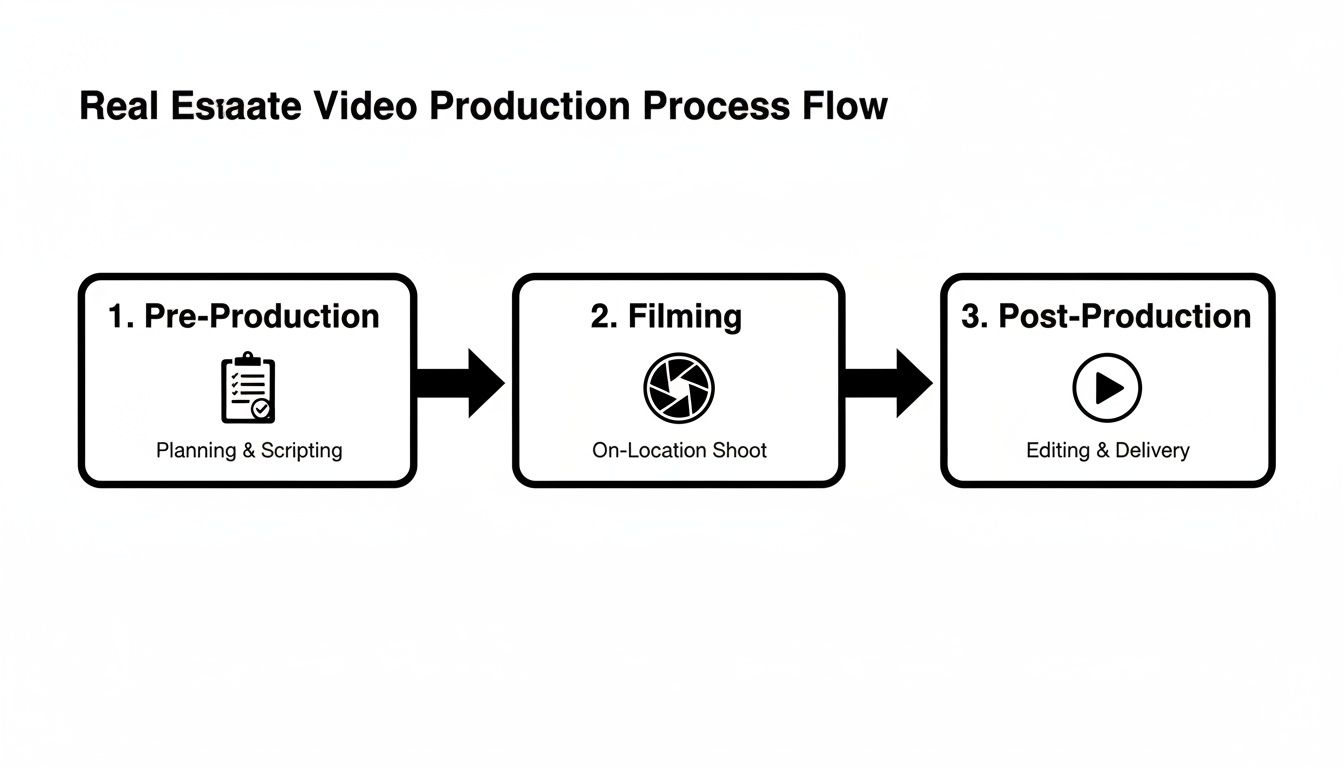
Here's a quick breakdown of that workflow to keep in mind.
Real Estate Video Creation Workflow at a Glance
| Phase | Key Objective | Essential Tools |
|---|---|---|
| Pre-Production | Plan the story, create a shot list, and prepare the property. | Script template, shot list, calendar, staging checklist. |
| Production (Filming) | Capture all necessary footage, including wide shots, details, and exteriors. | Camera (DSLR, mirrorless, or phone), tripod, gimbal, lighting. |
| Post-Production | Edit clips, add music/voiceover, color correct, and export. | Video editing software (e.g., DaVinci Resolve, CapCut), audio library, graphics. |
Think of Pre-Production, Production, and Post-Production as the foundational pillars of your video strategy. From my experience, the more effort you put into the planning phase upfront, the more efficient your filming and editing will be. This guide will walk you through exactly what to do in each stage, with practical tips to get you going.
Crafting the Property’s Story Before You Film
The secret to a great real estate video isn’t fancy gear or slick editing—it’s the planning you do before you ever hit the record button. This is where you transform a simple property tour into a marketing tool that actually connects with buyers and gets them to picture themselves living there.
Before you even think about your camera, take a walk through the home. Your mission? Find its story. Every property has a personality. Is it a cozy family haven with a big backyard just begging for a swing set? Or is it a sharp, modern condo in the middle of the city, perfect for a young professional on the go?
Figuring this out first is the key. It’s the compass that will guide every single decision you make from here on out, from the shots you take to the music you layer on top.
Finding the Narrative and Speaking to the Right Buyer
Always start by asking, “Who is the perfect buyer for this place?” A growing family is going to care about completely different things than a retiree looking to downsize. When your video speaks directly to that ideal buyer, it becomes exponentially more powerful.
For that family-friendly house, you’ll want to focus your lens on:
- The open-concept kitchen where parents can cook while keeping an eye on homework at the island.
- That secure, fenced-in yard where kids and pets can play safely.
- The quiet, tree-lined street that feels safe and welcoming.
But for a downtown loft? The story completely changes. You’d want to highlight:
- Incredible city views from those massive floor-to-ceiling windows.
- A slick home office space that’s perfect for remote work.
- The walkability—showcasing how close it is to cool coffee shops and restaurants.
Once you know the story, sketch out a simple script or a voiceover outline. This isn't about writing a Hollywood screenplay. Just create a conversational guide that points out the lifestyle benefits, not just a boring list of features.
Here's a little trick I've learned: Instead of saying, "This kitchen features granite countertops and stainless steel appliances," frame it as an experience. Try something like, "Imagine hosting friends and family in this beautiful kitchen, perfectly laid out for entertaining." See the difference? You’re selling the experience, not just the materials.
Your Shot List: The Blueprint for a Smooth Shoot
With your narrative locked in, it's time to build a shot list. Think of this as your game plan for filming day. It ensures you get every single shot you need, saves a ton of time, and prevents that dreaded feeling of realizing you missed a key room after you've already packed up.
Your shot list should walk the viewer through the home in a way that makes sense. A flow that almost always works is:
- The Curb Appeal: Start with a killer shot of the front exterior.
- The Welcome: Move to the entryway to create a sense of arrival.
- The Core of the Home: Flow through the main living areas—living room, kitchen, dining.
- The Owner's Retreat: Showcase the primary bedroom and its bathroom.
- The Rest of the Rooms: Give a good look at secondary bedrooms and other baths.
- The Extras: Don't forget unique features like a home office, a cool finished basement, or a patio.
- The Grand Finale: End with a great shot of the backyard or outdoor space.
For each spot on your list, plan to get a few different angles. Don’t just plant your tripod in a corner. Mix in wide shots to show the scale of the room, medium shots to connect the spaces, and a few tight detail shots to highlight quality finishes.
Prepping the Home for Its Close-Up
This is the final, and maybe most important, step before you film: getting the house camera-ready. A cluttered, dark home looks ten times worse on video. The goal is to make every room feel bright, open, and absolutely spotless.
Run through this checklist before every shoot. It's non-negotiable.
- Declutter like crazy. Personal photos, kids' drawings on the fridge, and knick-knacks have to go. Clear off every single countertop.
- Clean everything. The camera sees all—dust, smudges on windows, and dirty floors.
- Lights, lights, lights. Turn on every single lamp and overhead light in the house, even if it’s a bright sunny day. This fills the space with a warm, inviting glow and kills ugly shadows.
- Let the sun in. Open all the blinds and curtains. Natural light is your best friend; it makes spaces feel bigger and more alive.
- Stage simply. You don't need to be an interior designer. Small touches like a bowl of fresh fruit on the kitchen counter, a vase of flowers on the dining table, or fresh, neatly folded towels in the bathroom make a huge difference.
Putting in this prep work guarantees the home looks its absolute best, which makes your job of capturing it beautifully so much easier.
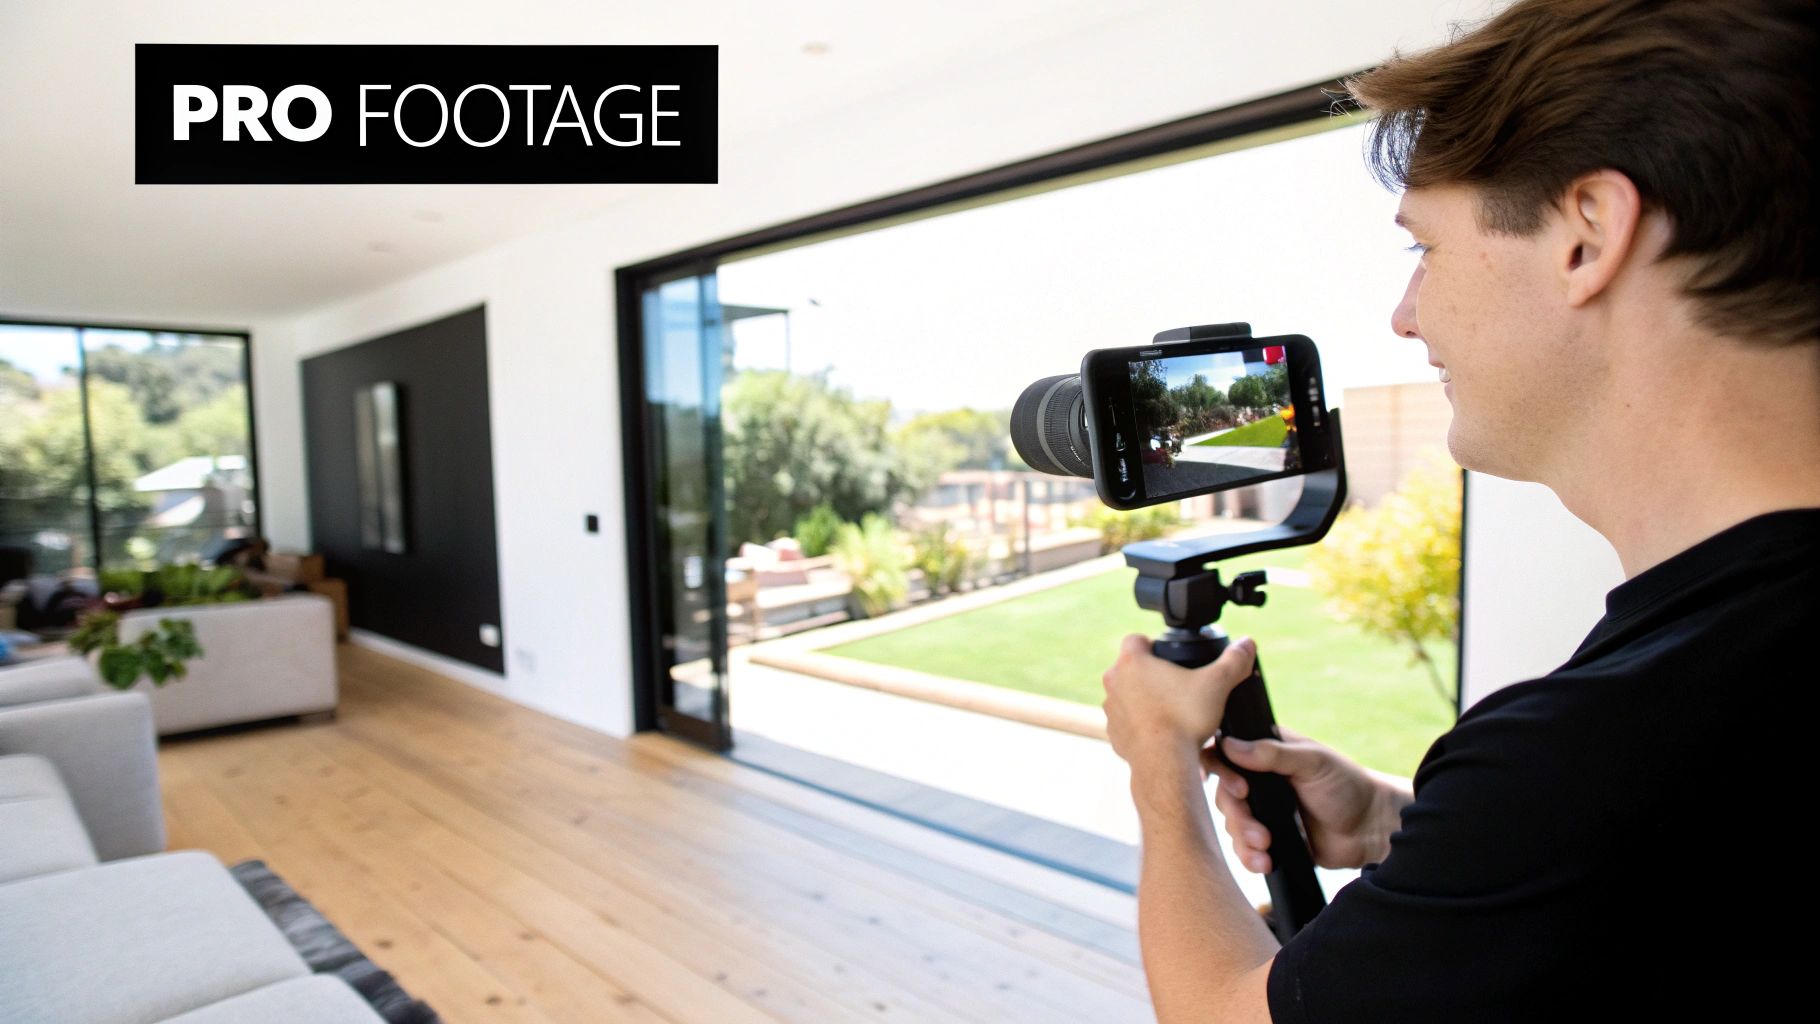
Getting Great Shots Without a Hollywood Budget

You don’t need a five-figure equipment budget or a massive film crew to create a beautiful real estate video. Honestly, some of the best gear you can use might already be in your pocket. The real magic isn’t in the price tag of the camera; it's in knowing how to capture footage that’s smooth, bright, and genuinely engaging.
Whether you're working with the latest iPhone or a mirrorless camera, the core principles of good videography don't change. You want the viewer to feel like they're gracefully walking through the home, not watching a shaky, homemade video.
Picking Your Gear
Your smartphone is a powerhouse. Modern phones shoot in crisp 4K resolution, which is more than enough for any social media platform, ad, or MLS listing. The secret to making phone footage look pro is stabilization. A simple gimbal—a handheld stabilizer that can cost as little as $100—will completely transform your shots from jittery to cinematic. It's a small investment with a huge payoff.
If you're ready to step up, a DSLR or mirrorless camera gives you a lot more creative control. Their larger sensors are a lifesaver in low-light situations and let you swap out lenses. A good wide-angle lens is a real estate videographer’s best friend, making even cozy rooms feel more spacious and open.
Then there's the drone. Drones are no longer a novelty; they’re a necessity for high-end listings. Opening your video with a sweeping drone shot of the property and its surroundings sets a powerful, professional tone. It’s no surprise that 80% of active listing agents now use drones, and those listings have been shown to sell 68% faster. The ROI in real estate marketing for tools like this is undeniable.
Framing Your Shots Like a Pro
How you frame a room is just as important as your camera's resolution. Great composition is all about guiding the viewer's eye and making every space look its absolute best.
Start with the rule of thirds. Picture a 3x3 grid over your screen. Instead of putting the most interesting feature—like a fireplace or a stunning kitchen island—dead center, try placing it along one of the grid lines or at an intersection. This simple trick instantly makes your shot feel more balanced and professional.
Next, find the leading lines. Look for natural lines in the home that draw the eye deeper into the shot. This could be a long hallway, the edge of a countertop, or even the lines in a hardwood floor. Using them creates a sense of depth and flow, making the space feel more three-dimensional and inviting.
A common mistake I see is shooting from eye level. Get lower! Filming from chest or waist height (around 4-5 feet) provides a much more natural and flattering perspective. It helps viewers feel like they are actually in the space, not just looking down on it.
Using Smooth, Intentional Camera Movements
Static shots are okay, but deliberate motion is what brings a video to life. The key is to keep your movements slow, steady, and purposeful. Rushed, jerky camera work is the fastest way to look like an amateur.
Here are a few essential movements to practice:
- The Pan: A slow, horizontal sweep across a room. This is perfect for revealing an open-concept living area or showing off a beautiful backyard view.
- The Tilt: A vertical movement, either up or down. A slow tilt-up is fantastic for emphasizing high ceilings, a grand staircase, or a custom light fixture.
- The Push-In: Slowly and smoothly moving the camera forward. Use this to draw attention to a specific feature, like a cozy fireplace or a high-end appliance.
- The Pull-Back: The opposite of a push-in, where you slowly move backward. This is a powerful way to reveal the full scale of a large room or to transition from a detail to a wider shot.
Making Light Your Best Friend
Lighting is everything. A dark, shadowy room feels small and unappealing on camera. Your job is to make every space feel as bright, airy, and welcoming as possible.
Natural light is almost always the best light, so use it. Before you even think about hitting record, open every blind and curtain in the house. If you can, plan your shoot for the time of day when the property gets the most sunlight.
Even on a bright day, turn on every single light inside the home. That means lamps, overhead fixtures, sconces, and under-cabinet lighting. This technique, sometimes called "light layering," fills in any lingering shadows and adds a warm, inviting glow that makes the home feel lived-in and comfortable. Combining these simple on-site techniques will elevate your footage from good to great.
Turning Your Photos Into a Dynamic Video with AI
Let's be realistic—a full-blown video shoot isn't always practical. Tight deadlines, homeowner schedules, and budget constraints can make getting a videographer on-site for every listing a huge headache.
But what if you could create a slick, professional video without shooting a single frame of new footage? That's exactly what photo-to-video AI tools let you do. They take your existing high-res listing photos and transform them into a cinematic tour that feels engaging and alive. It's an incredibly practical way to get a video for every single property you list.
What’s Happening Behind the Scenes?
Don't mistake this for the clunky slideshows of the past. Modern AI platforms are far more sophisticated. They analyze each photo to understand its depth and composition, identifying key elements like windows, furniture, and architectural lines. From there, the software intelligently simulates real camera movements to make the still image feel dynamic.
An AI tool can, for instance:
- Pan slowly across a wide shot of the family room, mimicking the natural way someone would scan the space.
- Dolly in gently on a stunning kitchen island, pulling the viewer's attention to that key selling feature.
- Add a parallax effect, where foreground objects move at a different rate than the background, creating a genuine sense of three-dimensional space.
These subtle movements are the same techniques a pro videographer would use. They turn a simple set of photos into a fluid, compelling property tour that truly showcases a home's layout and atmosphere. To see just how powerful this can be, check out our deep-dive guide on how to create AI real estate videos.
Choosing the Right Photos to Tell the Story
The magic of the AI hinges entirely on the quality of your source material. Garbage in, garbage out. The better your initial photos, the more impressive your final video will be.
Think like a director. Arrange your photos to guide the viewer through the home logically, just as you would with a shot list. Start with a killer exterior shot, flow through the main living spaces, and finish with a memorable feature like the backyard or a primary suite.
I see this mistake all the time: agents only use wide-angle shots. While you need those to show the scale of a room, a video full of them gets boring fast. Mix it up! Include medium shots and even some close-ups of specific details—the intricate backsplash tile, the high-end faucet, or the custom millwork—to add texture and keep viewers engaged.
When you're curating your images, be ruthless. Only choose photos that are tack-sharp, beautifully lit, and well-composed. A blurry or dark photo will only look worse once you add motion. The goal is a seamless visual narrative that makes the property shine.
Your Polished Video is Just Minutes Away
One of the best parts about this workflow is the speed. Tasks that once took an editor hours can now be done in the time it takes to grab a coffee.
The process itself couldn't be simpler. You just upload your curated photos to the platform and drag and drop them into the order you want. After that, it's all about the finishing touches—picking a good royalty-free music track and maybe adding a few text overlays for the address or key features.
The AI takes care of all the heavy lifting, generating the smooth camera motion and seamless transitions for you. The result? A polished, shareable video ready to go in a tiny fraction of the time.
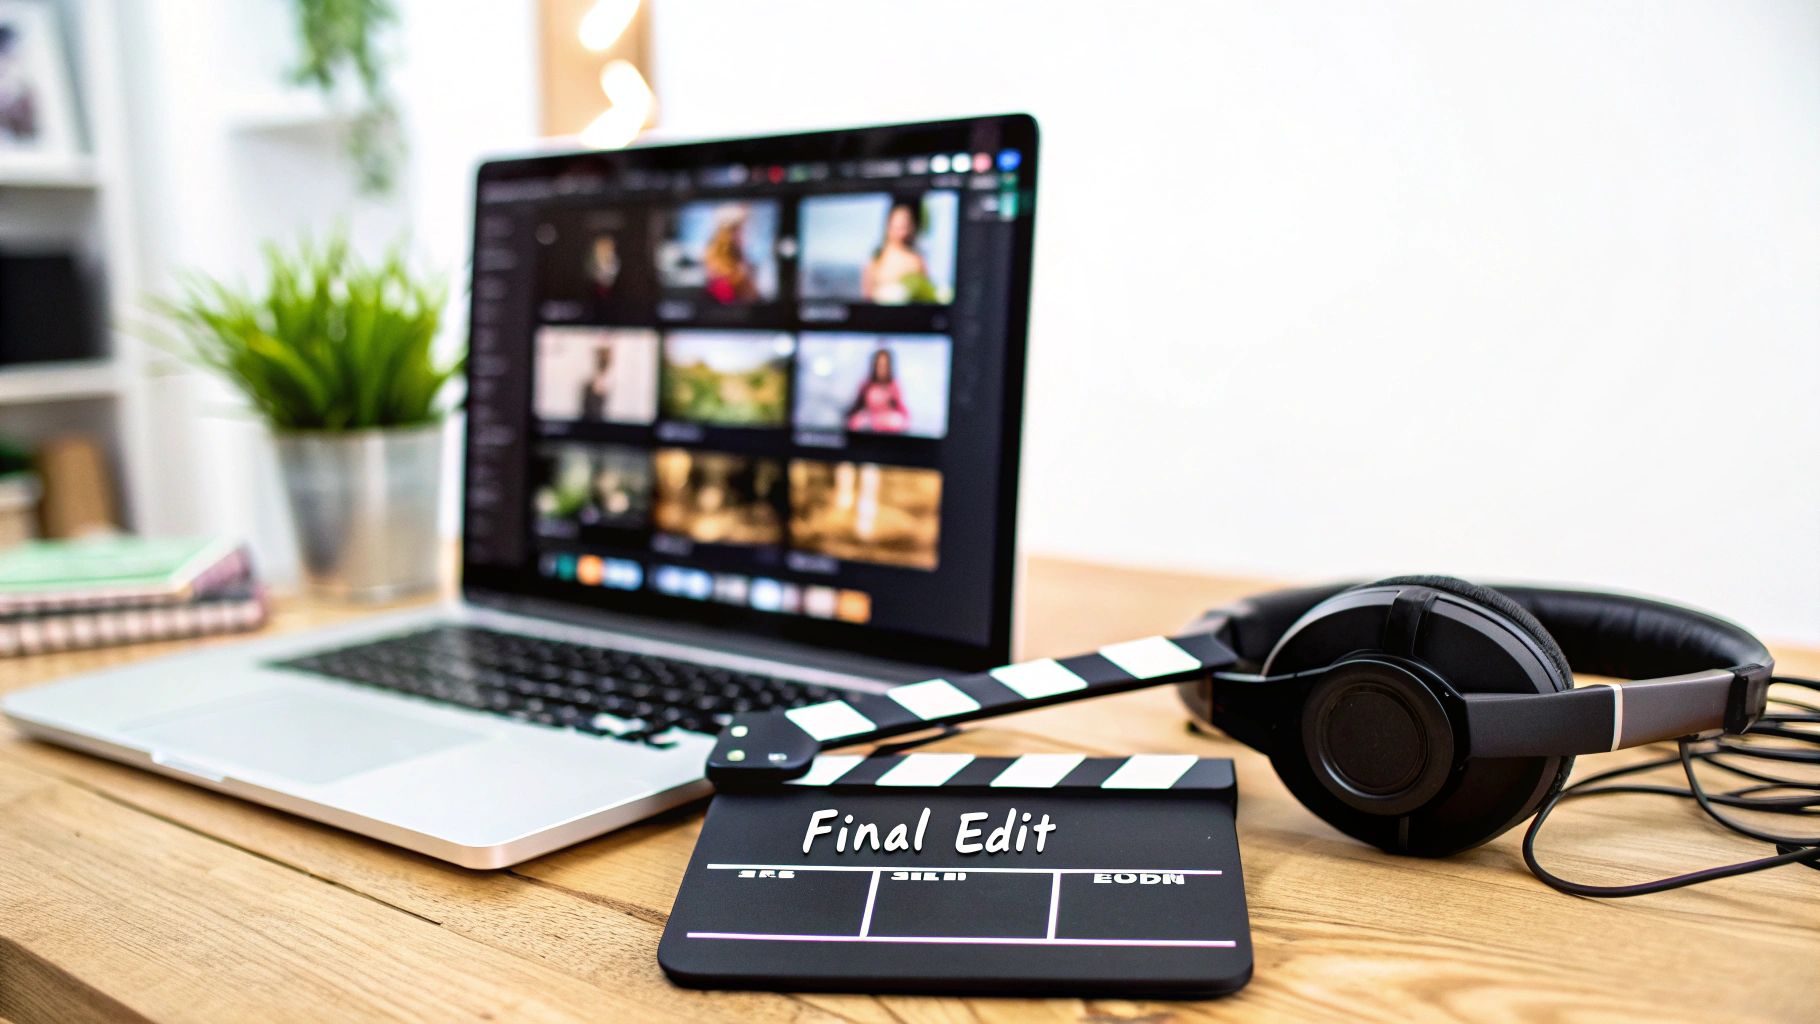
Editing Your Footage Into a Polished Final Product
This is where the real magic happens. You’ve captured all your shots, and now it's time to weave that raw footage into a story that actually sells the property. Post-production can feel like a huge hurdle, but with the right mindset and a few good tools, it’s a creative process that transforms a folder of clips into a polished, professional marketing asset.
Your main job here is to assemble everything in a way that feels natural and keeps people watching. That means arranging shots to follow a logical flow, trimming each clip to keep the pace snappy, and adding the finishing touches that make it look truly professional.
Think of yourself as a storyteller. Every single cut, transition, and sound choice needs to serve the narrative you’re building about the home.
Assembling Your Timeline for Maximum Impact
First things first, get all your clips imported into your video editing software. Once everything is loaded, you can start building your timeline, which is just the visual map of your video from beginning to end. Drag and drop your clips into the sequence you already mapped out in your shot list.
Always start with your best shot—usually a killer exterior or a sweeping drone shot—to grab the viewer’s attention right out of the gate. From there, guide them through the home just like they'd walk through it in person: entryway, living room, kitchen, primary suite, and so on. This creates a virtual tour that just feels right.
Don’t be afraid to leave footage on the cutting room floor. A classic rookie mistake is trying to cram every single clip into the final video. Be ruthless. Only keep the best, steadiest, and most visually interesting shots. A short, high-impact video will always outperform a long, rambling one.
Now, let's talk about pacing. Trim the start and end of each clip to get rid of any wobbly camera movements or awkward pauses. You want each shot on screen just long enough for someone to take in the space—I’ve found that 3 to 7 seconds is the sweet spot.
Enhancing Your Video with Audio and Text
Audio is the soul of your video; it’s what sets the emotional tone. The right background music can make a property feel warm, luxurious, or full of energy. Just make sure you always use royalty-free music from a reputable source to sidestep any copyright headaches. Pick a track that fits the home's vibe—maybe an upbeat indie song for a modern loft or a gentle acoustic piece for a cozy family home.
If you're adding a voiceover, record it with a decent microphone in a quiet room. Your script should be conversational and really focus on the lifestyle someone could have in this home. Keep the volume balanced so the music sits nicely behind your voice without drowning it out.
Text overlays are a simple but incredibly effective way to highlight key selling points. Use them sparingly to call out features like:
- "Newly Renovated Chef's Kitchen"
- "2,500 Sq. Ft. of Living Space"
- "Private Backyard Oasis"
- The property address and your contact info
Keep the text clean, easy to read, and on-screen just long enough for people to read it without having to hit pause. If you're looking to find the right tool for the job, it's worth checking out our guide on the best real estate video editing software, where we break down options for every skill level.
Color Correction and Final Polish
The last step before you export is color correction. This is what gives your video a consistent, professional sheen across all the different clips. Most editing software comes with basic tools to adjust brightness, contrast, and saturation.
The goal is to make the footage look bright, vibrant, and true to life. Bumping up the brightness just a bit can make rooms feel more spacious, while a small boost in saturation can make the colors pop. Just aim for a natural look that honestly represents the property.
Once you’re happy with the final cut, it’s time to export. Your video is now a powerful marketing tool, but it only works if people see it. Smart distribution is key. You'll definitely want to share it on YouTube, since an incredible 51% of homebuyers start their property search there. For quick-hit engagement, post on Instagram Reels, where social videos can generate 1200% more shares than static photos. And don't forget to embed it in your email newsletters, which can boost click-through rates by as much as 300%. Agents who nail this multi-channel strategy often see a 157% increase in website traffic and sell their listings faster. You can find more stats on the impact of video in real estate marketing to help you build your strategy.
Getting Your Video Seen by the Right Buyers
Creating a stunning video is a huge accomplishment, but let's be honest—it's only half the battle. A great video that nobody sees isn't going to help you sell a property. The final, and arguably most critical, step is getting that polished asset in front of qualified buyers with a smart distribution plan.
This means thinking beyond just dropping it into the MLS. Each platform, from YouTube to Instagram, has its own audience and its own rules of engagement. Tailoring your approach for each channel is what separates a video that gets a few dozen views from one that actually generates serious leads.
Exporting Your Video for Every Platform
Before you can share your masterpiece, you need to export it with the right technical settings. A one-size-fits-all approach just doesn't work here. Different platforms have unique requirements for resolution, aspect ratio, and file size, and getting this right is key to making sure your video looks crisp and professional everywhere.
Here’s a quick cheat sheet I always come back to:
- MLS & YouTube: Go for 1080p or 4K resolution with a standard 16:9 (horizontal) aspect ratio. This is your best bet for high-quality playback on desktops and smart TVs.
- Instagram Reels & TikTok: Think vertical. A 9:16 aspect ratio is a must. You'll likely need to create a separate, vertically-oriented edit of your video for these platforms.
- Facebook & Instagram Feed: I've found that a 1:1 (square) or 4:5 (vertical) aspect ratio performs best. It simply takes up more screen real estate on a phone, which stops the scroll.
Thankfully, most editing software has built-in presets for these platforms, making it pretty painless to export multiple versions of your final cut.
Optimizing Your Video for Search and Clicks
Once your files are ready, it’s time to help people find them. Video SEO is crucial, especially on platforms like YouTube and Google. It all starts with a compelling title that includes the property address and a key feature.
For instance, instead of a generic title like "New Listing Video," try something like "123 Maple Street | Modern Farmhouse with Pool in Austin, TX." It's far more descriptive and packed with the exact keywords potential buyers are searching for.
Don't neglect the description, either. It’s valuable real estate. Write a few paragraphs that tell the property's story, highlight its best features, and—most importantly—include your contact information and a direct link to the full listing page.
A fantastic video needs a thumbnail that demands to be clicked. Never let the platform choose a random, blurry frame for you. I always design a custom thumbnail showing off the absolute best photo of the property (usually that stunning curb appeal shot) and add a clean, bold text overlay with the address.
A Multi-Channel Promotion Strategy
To really maximize your reach, you need to share your video everywhere your audience spends their time. The goal is to create multiple touchpoints that all lead interested buyers back to your listing.
Here’s what your promotion plan should look like:
- Embed on the Listing Page: This one is non-negotiable. The video should be front and center on the property's dedicated webpage.
- Native Social Media Uploads: Don't just share a YouTube link on Facebook. Upload the video file directly to Facebook, Instagram, and LinkedIn. Their algorithms favor native content, and you’ll see much better performance.
- Email Newsletter Feature: Send a dedicated email to your subscriber list with an eye-catching thumbnail that links directly to the video.
The impact of doing this right is huge. Realtors who use video marketing effectively grow their revenue 49% faster than their peers. Despite this, only about 9% of agents are currently creating listing videos, which is a massive opportunity to stand out from the competition. You can read more about these stats over at Keeping Current Matters.
To put all these ideas into action, be sure to check out our complete guide to real estate video marketing.
Common Questions About Real Estate Videos
Jumping into video can seem intimidating, but honestly, it’s easier than most agents think. I've found that almost everyone gets hung up on the same few questions when they're just starting out. Let's tackle those head-on so you can feel confident hitting that record button.
How Long Should a Real Estate Video Be?
This is probably the number one question I hear. The answer really depends on where you plan to share it.
For a full property tour you'd put on your website, YouTube, or the MLS, a good target is 2 to 3 minutes. That’s the sweet spot—enough time to really show off the home’s character and key features without your potential buyers getting bored and clicking away.
Social media, on the other hand, is a completely different ballgame. You need to think shorter and punchier. A 60-second highlight reel is perfect for platforms like Instagram or Facebook. The goal here is to stop the scroll and hook people instantly.
When Is the Best Time to Post Videos?
Timing your posts can make a huge difference in how many people see them. While every local market has its own rhythm, I've seen the most success by posting on weekdays.
Think about when people are taking a break and scrolling their phones:
- Lunchtime: Between 11 AM and 1 PM
- After Work: From 5 PM to 7 PM
My best advice? Use these times as your starting point, but then dive into your social media analytics. Your own data will tell you exactly when your audience is most active. Ultimately, posting consistently is far more important than finding that one magical time slot.
Do I Really Need a Pro Camera and Expensive Gear?
Nope. You absolutely don't. While a professional setup is nice to have, your smartphone is more than capable of producing incredible video. The real magic isn't in the camera; it's in how you use it.
Focus on the fundamentals: find good, natural light, keep your shots steady (a simple gimbal is a game-changer), and tell a clear story about the home. A shaky, poorly lit video shot on a $5,000 camera will always look worse than a smooth, well-lit video from an iPhone.
At the end of the day, it's about making a connection and standing out. And it works. Remember that 73% of homeowners say they are more likely to list with an agent who uses video. It's a massive advantage for winning listings. You can dig deeper into the impact of real estate video marketing to see just how much it can influence sellers.
Ready to create stunning videos without the hassle of filming? AgentPulse uses AI to turn your listing photos into cinematic tours in minutes. Try AgentPulse for free and elevate your marketing today!